Installation Instructions Flooring
Before Delivery:
Conditions onsite must be ideal before any flooring is fitted. Wet trades like screeds, plastering and decorating need to be complete and the building must be thoroughly dried out. Windows and doors should be fitted and watertight
Preparing the Subfloor:
The surface immediately beneath an Oakley Products natural wood floor must be in good structural condition, free from damp rot, fungal or insect infestation, and contaminating residues. It must be flat with uneven areas not exceeding 3mm over a 2m area.
The surface should be vacuumed and totally free of debris before fitting begins. Hot pipes should be well insulated to prevent localised hotspots, which can cause wood flooring to warp or shrink. If installing over floorboards, ensure the voids beneath have a height of approx 600mm from the ground to the bottom side of the joists.
Check that the voids are vented around the perimeter and that these vents are positioned to allow air flow under the entire floor. As a general rule, all venting should equal a minimum of 1.5% of the total m2 of the installation. Vents should be kept open all year round.
The room temperature and humidity levels need to be stable before Oakley Products flooring is delivered to site.
ACCLIMATISATION:
Trees take time to grow, and likewise, an impressive wood floor installation is never rushed. The sealed, unopened boxes should be laid flat, in the centre of the room for three to four days beforehand. DO NOT store the flooring outdoors, in an outbuilding, or anywhere with damp or condensation problems. The conditions where the flooring is acclimatised should be as close as possible to the living environment where it is to be laid.
EXPANSION GAPS:
As wood is a natural product, it will expand and contract with changes in temperature and humidity. That’s why when a wood floor is fitted, expansion gaps need to be left wherever the boards meet a wall, structural support, stairs, breakfast bar, fireplace, central heating pipe…etc. Gaps must also be considered at doorways to allow for the differing expansion between rooms. Place spacers at regular intervals when fitting and then remove them before skirting boards, beading or trims are put in place. Allow a 2mm gap for every metre span of the floor with a minimum of 10-15mm gap regardless. For areas over 5m in width, extra provisions should be made for expansion.
THE FIRST ROW:
Before installation can begin a few calculations need to be made, and you might have to do some cutting before you can start laying. When you’ve chosen your starting wall, measure the width of the room from there and divide that by the width of the flooring panels. This will give you the number of rows of boards you’ll lay and the width of the last row. If your last row is going to be under 60mm wide, cut the boards in your first row lengthwise accordingly so that your last row isn’t too narrow.
Installation instructions of floating floor (using underlay)
Oakley’s engineered wood flooring can be installed over concrete, anhydrite, existing wood floor chipboard, ceramic tiles, terrazzo, metal, PVC, linoleum, slate, marble, particleboard, OSB and plywood – but not carpet.
The type of underlay you need will depend on the subfloor condition. However, for most installations we recommend using an underlay with a built-in damp proof membrane, such as Serenity and Eco Gold Lay. See our full range at www.oakleyproductssw.co.uk.
Underlay should be laid edge-to-edge perpendicular to the direction of floorboards. Stick it together with tape. We do not recommend overlapping the underlay.
FOLLOW THESE INSTALLATION INSTRUCTIONS STEPS
- Start installing along the longest wall or an outside wall which is likely to be straight and square with the room. Using one of the longest boards, install your first plank with the tongue facing away from the wall. Take great care with the alignment as misaligned starter rows can cause side and end gaps.
2. Use the remainder of the last plank in the first row to start the second If the off cut is less than 200mm in length, cut a longer piece for the first board in your second row. As you continue to install, make sure that all boards are staggered so there’s no less than a 300mm gap between joins in adjacent rows. This makes for a more appealing floor and reduces waste.
- We recommend locking the header joints of each row together first so the floor can be installed row by row. If you need to install the planks separately, connect the long side of the board then use a block and mallet to tap the header joint into the next plank. Alternatively, you can connect the header joint with the previously installed plank, lift both to an angle of 30 degrees then slide into the long joint before locking into position.
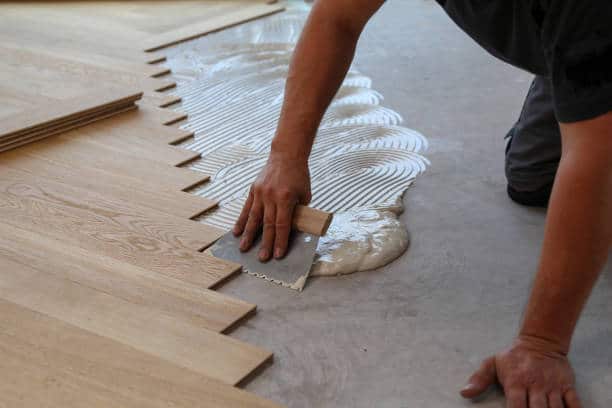
Gluing Down (bonding wood flooring)
Oakley’s Floors can be glued directly to concrete, ceramic tiles, terrazzo, metal, slate, marble, OSB or plywood. Ensure the existing surface is ‘rough’ or porous. Pre-sand any slick or sealed surfaces – gypsum and anhydrite screeds especially need to be abraded to remove the soft surface laitance. When gluing to concrete, we recommend using Wakol Ms Polymer to ensure a strong bond between the subfloor and adhesive. Designed specifically for our natural wood flooring, Wakol MS 260 adhesive will hold the floor after a short open time of 30 minutes but remain flexible to allow for the expansion and contraction of timber between seasons. It’s essential that there’s a full bond between each floorboard and the surface beneath.
FOLLOW THESE INSTALLATION INSTRUCTIONS
- Start installing along the longest wall or an outside wall which is likely to be straight and square with the room. Spread adhesive from the wall to the width of 2 planks. Use a 3 or 4.8mm notched trowel, depending on the condition of the
- Using one of the longest boards, install your first plank with the tongue facing away from the wall, and secure into Take great care with the alignment as misaligned starter rows can cause side and end gaps.
- Use the remainder of the last plank in the first row to start the second row. If the off cut is less than 200mm in length, cut a longer piece for the first board in your second As you continue to install, make sure that all boards are staggered so there’s no less than a 300mm gap between joins in adjacent rows. This makes for a more appealing floor and reduces waste.
- Once you’re sure the first two rows are straight and secure, spread 700mm – 900mm of adhesive across the length of the Never spread more than can be covered in 30 minutes.
- Allow the adhesive to cure for approximately 2 hours before permitting light foot traffic, and 24 hours before moving furniture onto the floor.
Maintenance Guide
LACQUERED WOOD FLOORING
Oakley’s timber floors are designed to withstand the wear and tear of day-to-day life. Because wood is a natural material, it will react to the environment it is installed in – dry environments will cause a floor to lose moisture and humid environments will cause moisture to be gained. Using the correct cleaning products allows a wooden floor to adapt to its surroundings while still looking and performing as required.
PREVENTATIVE MAINTENANCE
Abrasive particles of dirt and grit trafficked on to a wooden floor can be very abrasive and seriously shorten the lifespan of any treatment. The floor’s surface will quickly become dull due to scratches and the wood may be affected by the ingress of moisture and stains. Matting placed at external entrances is essential in prolonging the appearance and life of the floor, whilst reducing the frequency of refurbishment. It is important that matting is of a type which can remove grit and absorb moisture. Matting should be large enough to allow two steps across it but, as a general recommendation, the mat should be as large as practical and be regularly cleaned.
It is also very important to ensure that the floor is protected from moveable furniture, such as tables and chairs, and a simple solution to this is to protect the floor by applying felt furniture feet to underside of the furniture legs. Regularly check and clean to reduce embedded grit or particles from scratching the wood surface.
LOOKING AFTER YOUR FLOOR
An effective maintenance programme will keep the floor clean and looking as good as possible. The following information is designed to provide a starting point and is appropriate for both commercial and domestic floors. However, all floors are unique and will require individual assessment because the factors affecting them will vary. Changes in traffic levels and seasonal changes will also need to be taken into consideration, for example, additional matting may be required during periods of snow or heavy rain. The frequency of any maintenance should reflect the use of the floor and should be altered accordingly. The Bona Cleaner product for cleaning and maintenance of lacquered wooden floors uses neutral cleaners to remove contaminants from the flooring. As floors are subjected to foot traffic over time, micro-scratches and patterns of irregular wear will occur. These products include the necessary materials to refresh the floor and rejuvenate the lacquer finish to elongate the life of the surface finish. We also sell felt pads to avoid damage from moving of furniture.
When signs of wear become visible on the floor finish, such as micro-scratches or irregular sheen in main usage or higher traffic areas, Bona Refresher can be applied to the flooring with a clean microfibre mop head at a consumption of approx. 50m2 per litre. If the flooring is a plank format, apply the refresher along the plank lengths, working systematically across the area to ensure even coverage.
NATURAL OILED WOOD FLOORING Maintenance Guide
Oakley’s timber floors manufactured with a natural oil factory finish use oils and waxes which are held within the surface of the wood itself to allow you to be as close to the natural material as possible. After factory application, these oils can be drawn deeper into the timber material so applying a finishing coat of hard-wax oil once the floor is installed will ensure saturation of the surface and leave the floor ready to tackle the wear and tear of day-to-day life. Because wood is a natural material, it will react to the environment it is installed in – dry environments will cause a floor to lose moisture and humid environments will cause moisture to be gained.
Using the correct cleaning products allows a wooden floor to adapt to its surroundings while still looking and performing as required.
PREVENTATIVE MAINTENANCE
Abrasive particles of dirt and grit trafficked on to a wooden floor can be very abrasive and seriously shorten the lifespan of any treatment. The floor’s surface will quickly become dull due to scratches and the wood may be affected by the ingress of moisture and stains. Matting placed at external entrances is essential in prolonging the appearance and life of the floor, whilst reducing the frequency of refurbishment. It is important that matting is of a type which can remove grit and absorb moisture. Matting should be large enough to allow two steps across it but, as a general recommendation, the mat should be as large as practical and be regularly cleaned. It is also very important to ensure that the floor is protected from moveable furniture, such as tables and chairs, and a simple solution to this is to protect the floor by applying felt furniture feet to underside of the furniture legs.
LOOKING AFTER YOUR FLOOR
An effective maintenance programme will keep the floor clean and looking as good as possible. However, all floors are unique and will require individual assessment because the factors affecting them will vary. Changes in traffic levels and seasonal changes will also need to be taken into consideration, for example, additional matting may be required during periods of snow or heavy rain. The frequency of any maintenance should reflect the use of the floor and should be altered accordingly. Oakley’s timber floors treated with a Natural Oiled factory finish celebrate the texture and character of a natural wood floor by impregnating the surface of the timber with natural oils and waxes to nourish and protect the flooring. Every piece of timber is subtly different in its density and structure, and it will adapt to the environment into which it has been installed. Treatment of the floor with Osmo Hard-wax Oil after installation gives a natural, durable finish to the floor in a choice of sheen level to suit personal taste.
After Installation Once the floor is installed and after any adhesives have fully cured, apply a coat of Osmo Hard-wax Oil to the floor. This can be applied with a Roller or Brush at an average consumption of c.24m2 per litre (c. 60m2 per 2.5L tin). Ensure that an even coat is applied to all areas of the floor surface – a buffing machine fitted with a white pad and oiling cloth can be used to ensure an even surface distribution if desired. Allow to dry for 4-6 hours (until touch-dry) after application before allowing foot traffic and overnight before moving furniture onto the floor. Full curing of the surface takes 4-5 days after application, during this time no wet cleaning should take place and rugs should remain off the floor until fully cured. Routine Cleaning and Maintenance Regularly vacuum the floor to remove dust and animal hair. The correct dilution of Osmo wash and care solution can be used to remove everyday dirt quickly and efficiently and maintain the condition of the surface finish. Blanchon Natural Soap can then be used periodically to clean the floor of grease and other stubborn stains and to replenish oils and waxes in the floor surface. Spillages on wooden floors should always be removed in a timely manner
Any Question?
Email: sales@oakleyproductssw.co.uk
Call: 01725 666132